Tag

bikram yoga

Core Strength, Iron Hour and Standing Head to Knee

By News
Core Strength Iron Hour Sterling Hot Yoga

Iron Hour helps build core strength, which helps improve your postures in the Sterling 60 and Gold 90 hot yoga classes!

In many of the standing poses in our yoga series, we talk about the locked knee.

The locked knee, in good alignment with the ankle and the hip, is absolutely important, and it takes a great deal of strength to maintain it for more than a few moments.

In Standing Head to Knee, locking both knees is especially challenging.

In this wonderful photo example, Jason Winn is executing the full expression of the pose where his arms are extended, no longer holding on to the foot.

Yes, absolutely, Jason has a tremendous amount of strength in his legs, but it’s core strength that’s holding it all together!

Strong abs, strong legs and strong arms (and a lot of determination) are what allows Jason to pull off this beautifully executed pose.

It’s strength that supports flexibility and flexibility that supports strength. And now, Sterling Hot Yoga Works can help you to attain both.

Adding Iron Hour to your practice is a great way to improve your Standing Head to Knee and many other poses! But remember, taking the Sterling 60 and the Gold 90 also helps you to maintain good overall health! It all works together!

Yoga Anatomy: Agonist & Antagonist Muscle Groups

By News
Agonist Antagonist Muscles How They Work

When you bring the hand toward the shoulder, the biceps is the agonist muscle and the triceps is the antagonist muscle.

In the last newsletter, we discussed the elements of alignment. I hope that you have had the opportunity to focus on your alignment both in and out of the hot room. Alignment is such an important part of you practice and of your life!

This time, we’ll talk about agonist and antagonist muscle groups. For almost every major movement in the body, there is an agonist and antagonist muscle involved.

The agonist muscle is the primary mover involved. Usually this means a contraction or shortening of the agonist muscle in order to create movement.

The antagonist muscle has several functions. It can relax (lengthen) in order to allow the agonist muscle to function to its fullest. It can also slow down the movement of the agonist muscle to prevent tearing or overuse.

An example is the biceps and triceps muscle group. When you do a biceps curl (see image above), the agonist muscle is the biceps, and the antagonist muscle is the triceps.

Now this is where it can get tricky. When you create the opposite movementwhen you bring your hand AWAY from your shoulder (see image below)the agonist muscle is the triceps and the antagonist muscle is the biceps.

Agonist Antagonist Muscle Groups Illustration

When you bring the hand away from the shoulder, the agonist is the triceps and the antagonist is the biceps.

This is because in order to create the movement of bringing the hand away, the triceps has to contract or shorten and the biceps has to lengthen or relax.

Why is this important in yoga? Because if you understand the relationships between muscle groups, you can work smarter to get the most out of your practice!

When you contract (or shorten) your quads (agonist), you will help your hamstrings (antagonist) lengthen more effectively and more safely.

When you suck your stomach in, thus contracting your abs during a forward bend (agonist), you will help to more efficiently stretch the muscles in your back (antagonist).

Think about all the muscle pairs that work together in the movement of the body. Different movements will engage different muscle groups in the wrist, arm, shoulder, spine, hips, knees and ankles. Think about what muscles you contract in order to get other muscles to relax.

Here’s another element to consider: as mentioned above, another job of the antagonist muscle is to slow down the movement to ensure a safe bend. In our muscles, there are these things called “stretch receptors.” They are there to prevent you from overstretching and tearing muscle.

When you first start to stretch, you might find resistance in the muscle. But if you hold the stretch, in a few moments, you might find some relaxation and give in the muscle, thus allowing you to stretch deeper. That’s the stretch receptor saying to the muscle, “Okay, I can see this is a safe stretch, you’re not going to tear anythinggo ahead.”

This is why, for example, in Standing Separate Leg Stretching, it’s so important to both contract the quads (agonist) to release the hamstrings (antagonist) and also hold the pose for probably longer than you’d like to get the best stretch possible. Bouncing is not so good; a long, slow, firm and constant pull will get best results.

So in November, think about your agonist and antagonist muscles!

How to Lock the Knee in Proper Alignment

By News
Proper Locked Knee Alignment Bikram Yoga

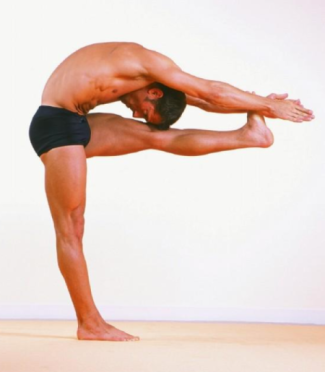
Engage your abs in the balancing series poses. Your core strength helps with both balance and alignment.

When people first start to practice and hear teachers tell yogis to lock their knee, a variety of thoughts pop into their head:

“No way! My coach told me to always keep the knees bent!”

“No way! My drill sergeant (or choral teacher or minister) told me I’d pass out if I locked my knees!”

“No way! That will hurt!”

“Okay”

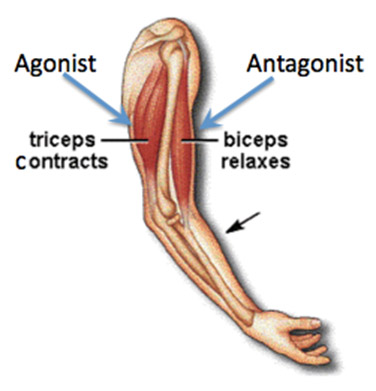
Every one of these answers is a legitimate response. The key to locking your knee is knowing HOW to lock your knees and how to NOT lock your knees. There’s a big difference.

Locking the Knee Proper Alignment Bikram Yoga

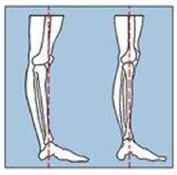
A properly locked knee maintains the natural alignment of the leg (right).

When you hyperextend your knee, the weight of your body is on the heel of the foot and the knee joint is pushed beyond the natural alignment of the leg (see image to the left).

Obviously, the leg on the left is positioned beyond where it should be; the leg on the right is in better alignment.

Let’s further examine each of the poses in the balancing series to discuss the best way to achieve proper knee alignment in each. (Hint: There’s one pose in the balancing series that’s easier than the rest to maintain a locked knee!)

Lock Knee Alignment Bikram Yoga

A hyperextended knee puts more weight on the heel and takes the knee out of proper alignment.

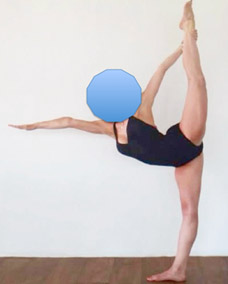
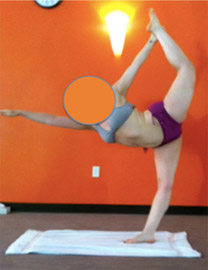
Compare these two Standing Bow images:

Initially the image to the right looks like a fairly impressive standing bow. But upon closer inspection, you can see that this yogi’s standing leg is hyperextendedshe is out of alignment.

Over time, this leads to over stretching, tearing of ligaments and tendons, and grinding of bone. In fact, this person, after years of holding the pose like this, suffered a torn meniscus in one of her knees!

Take a look at the image on the bottom right. Can you see the difference?

Can you see how this yogi’s standing leg is strong and her quadriceps and inner thigh are engaged?

Can you see how the weight on her foot is equally distributed and she is not leaning too far back into the heel or to the outside of the foot? This is the locked knee you are striving for!

It’s easiest to hyperextend the knee in Standing Head to Knee and Standing Bow because it takes strength to create the counterbalance necessary to stay in alignment.

Proper Lock Knee Alignment Standing Bow Bikram Yoga

A properly locked knee in Standing Bow depends on even weight distribution in the foot and a strong kick up.

In Standing Head to Knee, be mindful of the weight on your heel. When you grab your foot and start the pose, think UP and immediately contract your quads and engage your inner thighs to keep your leg in alignment. This will take practice.

Then when you kick out, be mindful of the weight on your heel and in the back of your knee. If you feel your weight dropping back, kick forward more! The action of kicking forward in combination with a strong standing leg will keep you in alignment.

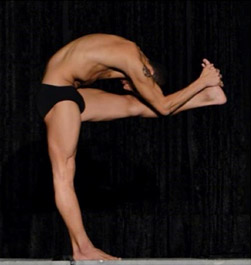
And keep your stomach sucked in! See how the abdominal muscles are engaged in the photo at the top of the page? Your core strength will help with balance and alignment!

In Standing Bow, again it’s all about the strength of the standing leg, but it’s also about kicking and stretchingthey are equal and simultaneous, 50-50ever hear that before?

By really reaching forward with the extending arm and kicking with your lifted leg, you will keep the weight in your standing leg more evenly distributed. It all works together!

The Balancing Stick posture is the easiest of the three balancing poses to keep your leg in alignmentwhy? Because your standing leg is like the fulcrum of a teeter totterthe weight is, more or less, more equally distributed across the plane of your body.

But that doesn’t mean you can relax in this posturekeep your leg engaged and keep stretching forward and backwardstretch, stretch stretch!

None of this is easy. It takes a lot of practice and just when it seems you’ve got it down, your leg will relax, you’ll lose your hard-earned balance, or something will happen and you’ll fall out. Not to worry, just keep trying.

And if you want to see what your balancing legs look likelet our teachers knowthey are happy to take some time before or after class get your photo while you’re in the postures!

Remember the key is to Lock the Knee AND Stay in Alignment!

Half Tortoise: Did You Know?

By News
Half Tortoise Pose Benefits Bikram Yoga

Touching your forehead to the floor is an important step in Half Tortoise pose.

There’s a reason we tell you to touch your forehead to your knee, or to the floor!

The pineal gland, also known as “the third eye,” is a small endocrine gland in the brain. It produces melatonin, which affects both sleep patterns and circadian rhythms.

As we age, the pineal starts to develop calcium deposits, which isn’t necessarily a good thing!

Touching your forehead to your knee or the floor can help to stimulate the pineal gland.

Now I’m not sure that doing Half Tortoise is the equivalent of eight hours of sleep, but it just might help balance your sleep/wake cycles and stimulate the release of melatonin!

So do your yoga—touch your forehead!